STELLA'S TOMB RAIDER CHRONICLES REMASTERED WALKTHROUGH
NOTES ON THE REMASTER: I have attempted to provide running kill, item, and secret counts. (Details are in a footnote following the first-level walkthrough.) I have also tried to cover all achievements/trophies, except New Game+. These guides are based on classic tank controls, but I hope they will be useful for those using modern controls. Follow this link for the archived classic guide. Chronicles does not include a "Restart Level" option, so I recommend making a new save at the beginning of each level in case you need to replay. Follow this link for Steam/GOG save files.
BUG NOTES: The original game, released in 2000, includes several game-breaking bugs in this level. If you are playing the old version, I highly recommend using the classic guide. It includes various suggestions and work-arounds that can make your playthrough easier. There are still a few bugs in the remaster. The ones I'm aware of are noted below.
LEVEL 13: RED ALERT! (Remaster)
Updated: 12/21/25(†)
LEVEL MAP by VGCartography (used with permission)
Chronicles Remastered Video Walkthrough by Eldincy‡
Pickups: 21, including Grappling Gun, 2 Key Bits, and 3 Golden Rose Secrets*
Kills: 18*
IMPORTANT: Like all good final levels, this one is difficult. But unlike previous Tomb Raider games, you have neither unlimited ammo nor the luxury of collecting supplies for many levels beforehand. I have attempted to describe strategies to conserve both health and ammo. As always, I recommend making a new save at the start of each level, in case you get stuck and need to replay. If you're playing the Steam/GOG version, you can download remastered save files here.
Cutscenes: Between the previous level and this one, we see Von Croy and another man, perhaps his father, talking to a guard.** After watching their intruder on a security monitor, Werner is able to identify Lara. Then there is a second brief cutscene of a helicopter hovering outside shooting into the building.
EXPOSED STAIRWELL: You begin the level on the stairs. Before taking a step, equip the HK in sniper mode, pivot to the right, activate the scope (Look button), and headshot the guy in the power suit on the landing above. As long as you don't move from the starting position, he won't notice Lara. When he falls, he takes out a section of staircase. (screenshots)
NOTE: As in the previous VCI levels, armored soldiers are not added to the kill count on the in-game Statistics screen.
You can't progress by heading down, since the stairs collapse as you approach. Instead, climb the mangled stairs to the landing where the armored guy was standing. Turn right, take a running jump to grab the next higher landing, and pull up. Move up to the next landing, amid blasts from the hovering helicopter (loud but not dangerous), and pause there. (screenshots)
Start up the next set of stairs, and quickly press Action to grab on as the stairs collapse out beneath you. (If you fall onto the stairs below, jump straight up to grab the end of the broken stairs and climb them like a ladder. Or, retrace your route up and around, then take a running jump to grab the broken stairs.) Once Lara is hanging from the broken-stair ladder, climb to the left into the brown alcove with the twisted metal bars and open flame (decorative not dangerous) and let go. Here you'll find a golden rose (1) (219/239) (SECRET #1, 34/36). When you have it, stand in the right side of the opening (near the flames), angle Lara toward the broken-stair ladder, and take a standing jump to grab it. Climb to the top. (screenshots)
As you pull up onto the landing above the ladder, another blast from the helicopter destroys more of the stairs. Turn right, walk up the short section of broken stairs, and jump onto the next landing. Turn right and take a running jump to grab the next higher landing. Pull up but don't rush forward. The helicopter will destroy the next set of stairs when you pass over it. So, walk not quite halfway up, then jump over the rest of the stairs as they collapse. (Or take a running jump from the lower landing to the higher one.)The blast from the helicopter and the residual flame won't harm Lara. Press Action to kick open the cracked wall. (screenshots)
ROOM BELOW GRATE: Follow the crawlspace forward and left. Quick-save before crawling out into a small room where Lara can stand. There's a soldier (1) (51/62) patrolling above. If he spots Lara through the grate, it will make the next section more difficult. Ideally, you want to wait until he moves off, then run to the far right corner, so Lara isn't directly under the grate. Press Look to reorient the wonky camera. Stand with Lara's back to the wall and watch the grate. The darker section is actually a trapdoor. When the soldier moves off to the right, step forward, stand under the trapdoor, jump up, and grab the edge to open it. Move back to the wall and wait for the soldier to return. Take him out from below with a headshot (or several shots using burst mode). If he notices Lara and jumps down into the room, switch to burst mode and kill him quickly. Then climb up through the grate and head toward the metal boxes. (screenshots)
NOTE: As in the first VCI level, if you headshot the guard before he notices you, the kill will not be added to the running total.
Voiceover: Zip warns Lara of danger ahead and advises her to use the infrared setting on her shades.
HALLWAY WITH LASERS: If you take Zip's advice and equip the headset, then press Action for infrared, you'll notice the hallway to the right is crisscrossed with 5 sets of invisible lasers. Equip the HK in sniper mode and shoot the red valve at the end of the hall beyond the lasers. Steam escapes, making the lasers visible. Before attempting to get through, pick up some HK ammo and grappling gun ammo (2-3) (220-221/239) on top of the boxes. (screenshots)
Approach the lasers carefully. The five sets are not in sync, but each has a distinct pattern: on, off, on, longer off. If you watch the pattern, you can run past each one in turn during the long-off phase. You can also use the white lines on the floor as a guide. After you pass each set of lasers, stop before the next white line, which indicates the position of the next set. For the last set, be sure to approach on the right side so you can run run through the doorway when the lasers go off. (screenshots)
FIRST ELEVATOR: Just beyond the laser traps, climb onto the stacked crates to find a large medipack (4) (222/239). When you move toward the other end of the hall, the ELEVATOR doors open and a soldier (2) (52/62) comes out. Kill him using sniper or burst mode. Go into the elevator and press the buttons to take a ride. Ready your weapon and face the doors opposite the ones where you entered. Those doors open, and there's another soldier (3) (53/62) waiting just outside on the left. (screenshots)
NOTE: Burst mode is generally best for enemies who are firing back. But if you have more health than ammo stockpiled, you can use sniper mode on both of these guys. Don't use the scope at close range, though, since it makes Lara an easy target. Just auto-aim and hop away from each soldier while firing. Lara will take a little damage but nothing a small medipack won't fix.
SHOOTING RANGES: Across from the elevator are two glass doors. These lead to the SHOOTING RANGES. The one on the right doesn't open yet, so go through the door on the left. Pick up the HK clips (5) (223/239) on the shelf and get ready for some target practice. (screenshots)
IMPORTANT: Save the game before beginning each of the two shooting ranges. You have only one chance to complete each one perfectly. You may also want to save in a separate slot before you enter the second range, in case you change your mind. Once you enter the second range, you're locked in until you complete it.
You must complete the first range in order to open the ARMORY at the end of the hallway and proceed in the level. As long as you destroy all the targets, this will happen. Completing the first range under the time limit will also open the door to the second shooting range. Completing the second range is optional but will enable you to get SECRET #2.
For the first range, press the button to activate the targets. Ready the HK (use sniper mode to conserve ammo) and use the scope to aim along the center line. Five targets will pop up and move toward you. In order to open the second shooting range, you need to destroy each target before it reaches the line on the floor nearest the window or stops moving. So shoot them in this order: center, left, far left, right, far right. (screenshots)
Before overwriting your previous save, exit the FIRST SHOOTING RANGE, turn left, and make sure the door to the SECOND SHOOTING RANGE is open. (screenshot) If it isn't, reload and try the first range again. Save again before entering the second range. Once you enter the second range you'll be unable to exit until you complete it flawlessly.
Inside, pick up more HK ammo (6) (224/239) on the shelf. Quick-save then press the button. Poison gas begins to leak in as soon as you activate the range. If you don't shatter all targets before they cross the middle line, Lara remains trapped here and dies. The first seven targets pop up one or two at a time. Try to shoot them in this order: center, left, far right, right, far left...far left again, far right. Try to anticipate where each target will be and aim there, rather than reacting as they pop up. (screenshots)
If you shoot the first seven targets before they reach the middle line, the last three pop up together. The center target is closest, but if you've just shot the far right target in the first group, it's probably easier to sweep to the left, shooting the right, middle, then left targets in order. If you don't see the last three targets, it means you made a mistake and need to reload and try again. When you've destroyed all of the targets before they cross the middle line, the door opens so you can exit. (screenshots)
NOTES: If you're struggling here and have ammo to spare, you can use burst mode and just sweep across the targets. This burns ammo but gives you a greater chance to hit each target. Just be sure not to waste too many bullets, since you'll need them later in the level. If you just can't do it, feel free to download a Steam/GOG save file.
ARMORY: After completing one or both shooting ranges, exit, turn right, and go to the far end of the hall. If you completed the second range, the room on the left will be open. Enter and pick up some HK ammo (7) (225/239) and a golden rose (8) (226/239) (SECRET #2, 35/36). Avoid the weapon racks with the deadly red lasers. Exit the way you came in. (screenshots)
The room across the hall opens whether or not you completed the second range. Inside you'll find more HK ammo (9) (227/239) on the floor and grappling gun ammo (10) (228/239) on the shelf opposite the entrance. There's also a GRAPPLING GUN (11) (229/239) on the rack with the green lights. (Again, avoid the racks with the red lasers.) When you take the weapon, a soldier (4) (54/62) comes in. Backflip away from the weapon rack and kill him quickly. Once you take the GRAPPLING GUN and the soldier comes in, the door through which you entered is sealed. You'll need to exit through the other door, which leads into a storeroom. (screenshots)
WELL-LIT STORAGE ROOM: Enter with your weapon drawn. Advance just until you hear dramatic music. Another soldier (5) (55/62) emerges from behind the crates. He's wearing a helmet with a faceplate; so going for a headshot won't work. Shoot him in the chest several times using sniper or burst Mode. (screenshots)
Climb on top of the stacked crates to get some HK ammo (12) (230/239). Equip the GRAPPLING GUN and use the scope (Look) to aim for the grate where the vents converge on the ceiling. (The targeting reticle flashes green when you're aiming at a viable target.) Shoot a grappling hook into the grate. Move to the right corner of the tall crate and step off to land on the crate below. Walk to the edge and take a standing jump to grab the rope. Slide to the bottom of the rope. Then swing toward the crumbling blue-black section of wall directly ahead. At the peak of the forward swing, jump and grab the horizontal crack in the wall. Traverse to the right, around the corner, and pull up into the metal duct. (screenshots)
NOTE: Refer to the rope swinging tips in the OLD MILL level if you need a refresher.
VENTILATION DUCTS: Proceed through the duct, but before sliding down the chute, ready the HK in sniper mode. Two guys in power suits (not counted) approach from the ELEVATOR ahead. Fortunately they can't zap Lara until they make their way up the ramp, so you have a few seconds to line up a headshot on each one. (screenshots)
NOTE: Unless you missed a pickup, do not go back into the ARMORY on the left. The door closes behind you, and you'll have to repeat the grapple swing and climb to the duct.
Return to the ELEVATOR and press the button inside to ride back to the previous floor. (screenshots)
HALLWAY NEAR THE LASERS (again): Another soldier (6) (56/62) now lurks ahead on the right, near the crates. If you keep the HK on sniper mode and walk carefully along the left wall, checking your scope every few steps, you can kill him with a well-aimed headshot before he notices Lara. (screenshots)
Return carefully past the 5 laser traps. (Again, stand clear of the white lines on the floor indicating each set of lasers. Watch the pattern: on, off, on, long off; and run past each set during the long-off phase.) If you didn't get the HK ammo and grappling gun ammo (2-3, above) on the crates just beyond the lasers, be sure to do that now. Continue to the grate with the trapdoor, drop through, and go back through the crawlspace to the EXPOSED STAIRWELL. (screenshots)
Use the GRAPPLING GUN to target the the twisted stairs dangling above the stairwell. (Again, the reticle will flash green when you sight the correct spot.) Shoot a hook into the metal. Position Lara on the stairs so she's squarely facing the dangling rope and the opening with the twisted metal bars on the other side of the stairwell. Walk to the edge, quick-save, then take a standing jump to grab the rope. Slide to the end of the rope. Work up a good, long swing. Then, on the forward swing, jump off the rope into the opening. Slide almost to the bottom of the slope, jump, and grab the ledge above the open flame. (If Lara slides into the fire, she'll die.) Pull up and crawl into the duct ahead. (screenshots)
SMALL STOREROOM WITH SOLDIER: Crawl through the duct to an opening overlooking a small storage room. Use Photo Mode or press the Draw/Holster Weapons button so Lara will kneel, giving you a better view of the room below. If the soldier (not counted if killed in stealth) standing below notices Lara, he'll press a button on the wall activating a gun turret, and Lara will take a lot of damage before she can pull the switch that opens the exit and escape. To avoid this, crawl to the right side of the opening and angle Lara to the right, facing the crate in the corner below. Press Jump to somersault out of the opening onto the crate. Equip the HK in sniper mode and kill the soldier with a single headshot. (This usually works even though he's wearing a helmet. Use burst mode if necessary.) Drop down, pick up the large medipack (13) (231/239) in the doorway and use the switch to open the door. (screenshots)
Follow the windowed corridor to the right. Press the button to call the SECOND ELEVATOR. Enter and press the button inside to descend. (screenshots)
LOBBY: Set your weapon to burst mode as you approach the doors; they should open automatically. As you near the wide steps, 2 commandos (7-8) (57-58/62) crash through the glass ceiling and descend on ropes. Shoot the soldier on the right first, then the one on the left. (screenshots)
NOTE: If you're low on ammo and good at aiming, you can use sniper mode. The guy on the right has a protective faceplate, though, so shoot him four times in the chest. Shoot the guy on the left once in the head.
Notice the DOOR TO THE HELIPAD, with the yellow 'H' sign and the key receptacle, at the top of the stairs. You'll need to find a key for it. To exit the LOBBY, move to the top step, then turn so Lara's back is toward the key receptacle and she's facing the dangling rope on the right. Take a running jump and grab the rope. Swing and jump to the top of the stacked crates. Stand in the middle of the crate and jump straight up to grab the handles of the angled metal doors to open them. (screenshots)
When the doors open, 2 more soldiers (9-10) (59-60/62) appear: one in the duct above and one down below. To avoid taking too much damage, immediately roll so Lara's back is against the wall and the soldier above can't target her. Take out the soldier in the HELIPAD doorway. Then roll and step back so you can shoot the one in the doorway above. When he's dead, climb up into the duct where he had been standing. (screenshots)
Follow the duct toward a button. The floor drops out from under Lara before she can press it. Slide down the chute and turn around. Before hopping down from the duct into the passageway, take note of the ladder on the wall ahead. You'll be exiting here later. (screenshots)
IMPORTANT: Most of the serious bugs in this level have been fixed in the remaster; however, there are still a few lingering issues. Be sure to save the game in a new slot before entering the next area. Do not overwrite this save until you finish the game. Hopefully you won't need it, but it's good to have a backup. Again, if you're playing the original game, there are additional bug notes in the archived classic walkthrough.
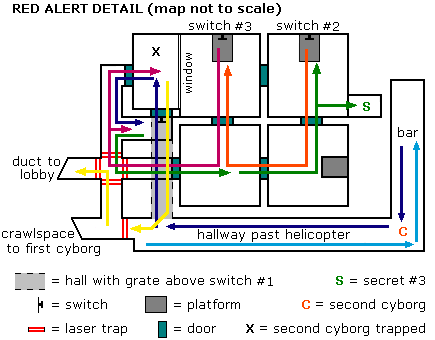
The next area is illustrated in this simplified map. (VGCartography's map is more detailed.) The various colored arrows show paths you'll take later in the level. You can ignore them for now.
Continue to a FOUR-WAY INTERSECTION. The doorway you just came through has no sign. The door to the left has a yellow "Caution" sign, the door straight ahead has a red "Danger" sign, and the door to the right has a yellow "H" sign, for Helipad. Lasers bar the "Caution" and "Danger" doorways, so head to the right. Here you'll see another laser-trapped doorway on the left and a crawlspace on the right. Go through the crawlspace, climb the slats, and continue forward. When you approach the end of the duct, the vent swings open. (screenshots)
FIRST CYBORG ROOM: Use Photo Mode to do a little recon. There's a cyborg (not counted) lurking below and some HK ammo (14) (232/239) sitting on a crate. There's also a red valve on the wall below and to the right of the duct, when facing it. (screenshots)
Set the HK to sniper mode. Angle Lara to the right and run off the right corner of the duct to land on the crate with the ammo. If you don't need it immediately, wait to pick up the clip, to minimize the damage Lara takes from the cyborg. While standing on the crate, quickly turn around. Lara will auto-target the cyborg, but don't return fire yet. Instead use the scope to target the red valve and shoot it to flood the room. You should see water gush out of the pipe, and the floor will be covered with water. Step back if necessary, take a standing jump into the duct, and move away from the opening. (screenshots)
NOTE: If you like, you can save the game here. Just be sure not to overwrite your earlier save in case you encounter a bug. Also, the ammo pickup will respawn if you run out.
DESTROYING THE FIRST CYBORG: Once you've flooded the room, as described above, you can stay inside the duct and shoot at the cyborg from relative safety as he paces below. Position Lara near the edge of the duct and use sniper mode—or burst mode, as long as you don't lean on the trigger—to gradually plug away at him each time he walks by. This requires patience, but it helps conserve health and ammo. (screenshots)
If the cyborg starts shooting at Lara, hop back, heal if necessary, then step forward and continue sniping. As the cyborg takes damage, his robotic skeleton will start to show. When his metal arm and leg are exposed and he starts to crackle with blue electricity, he's nearing death. After a few more shots, he'll short out and collapse, pooping out one of the KEY BITS (later) you need. The "Waterminator" achievement/trophy unlocks when he falls. Do not drop down into the water yet, or Lara will be electrocuted. (screenshots)
NOTE: Since you destroy the cyborg indirectly, he's not counted as an "official" kill. Once he's dead, you can save again. Just don't overwrite the save from when you first entered this area after sliding down the duct from the LOBBY.
FIRST KEY BIT: Shooting the valve earlier also opened the vent high on the opposite side of the room from the entrance. That's where you're headed next. Start by stepping off the right edge of the duct opening to land on the metal crate once more. Pick up the HK ammo (14) (232/239) if you didn't get it before. (screenshots)
Position Lara on top of the crate facing the outer corner of the lowest of the three sloping, metal ducts. Walk to the corner of the crate. Adjust your angle if necessary. Then hop back. Take a running jump from the crate to the duct. Do not press Action but continue to hold Jump during the entire sequence. If you've set it up correctly, Lara will land on the sloping top of the first duct, backflip off it, land on the sloping part of second duct, immediately jump forward onto the third, then backflip once more to land on the flat top of the second duct. No need to turn, grab, or slide. (screenshots)
Alternatively, you can take a small shortcut to avoid the complicated jumps. Start by standing in the middle of the crate, squarely facing the second highest duct. Walk to the edge. Pivot a little to the left to face the black grating ledge just to the right of the open duct where you came in. (The gushing pipe is below this grate.) Use the Look button to check the angle and adjust if necessary. Hop back once. Then take a running jump onto the grate. Do not press Action or Lara will fall short and be killed. You can tap Left in the air to pivot slightly toward the grate, but if you set up carefully, this won't be necessary. (screenshots)
NOTE: This short video shows both jumps. It was made in the classic game, but the moves still work.
Pick up the grappling gun ammo (15) (233/239) at the back of the black grate. Equip the GRAPPLING GUN and shoot a hook into the grate on the ceiling. (Again, the reticle will flash green when you sight the right spot.) Climb on top of the duct, walk to the front edge, then hop back once. Take a standing jump to grab the rope. Slide to the bottom of the rope. Swing back and forth. Then, on the forward swing, jump off the rope, pressing Action to land in the duct (or grab the edge and pull up). Go to the back of the alcove and use the switch to shut off the water and drain the room below. (screenshots)
Take a running jump from the opening past the dangling rope to the top of the duct where you came in. Pick up another grappling hook (not counted), which has mysteriously appeared on the black grate. Then drop to the floor. Take the large medipack (16) (234/239) and the KEY BIT (LEFT) (17) (235/239) the cyborg dropped. (screenshots)
Using the switch to drain the room also closed off the duct where you came in. So you'll need to climb back up, swing over to the high duct, and return the switch to the up position to re-flood the room and re-open the exit. Then take a running jump from the high duct, past the dangling rope, onto the lower duct. (Remember to avoid the electrified floor.) While standing on the duct above the opening, sidestep to the left or right so the rope is not directly behind Lara. Hang from the top edge of the duct. Let go and quickly grab the lower edge. Then pull up into the duct. Follow the duct to the end, hop down, and return through the crawlspace. (screenshots)
GLASS-WALLED HALLWAY AND LOUNGES: The lasers that were blocking the doorway opposite the crawlspace are now deactivated, but do not rush forward. The helicopter is waiting just ahead. You'll need to run under fire to the corner room at the end of this GLASS-WALLED HALLWAY, then on to a button behind the bar in the next room. (The path is indicated by the light blue arrows on the map above.) If you can make the first leg of that run, from the crawlspace to the corner room, without taking damage, you'll unlock the "Miss Croft" achievement/trophy. Tips and screenshots follow.
IMPORTANT: Do not shoot the yellow fuel tanks beforehand. This will make the no-damage run next to impossible.
BUG NOTE: Also, do not go up the ramp on the left yet (i.e., the doorway just before the first set of yellow fuel tanks). (screenshot) Prematurely exploring the area with the GAS CHAMBERS may result in a bug that prevents you from finishing the level. Details are below.
Quick-save, since this may take a few attempts. As you start forward, the helicopter begins firing. If you move quickly, you should be able to keep ahead of it. Take a series of running jumps along the left wall. Do not pause at all, especially near the yellow fuel tanks. If any of them are hit by stray bullets, they'll explode, injuring Lara and creating a pit in the floor, making it impossible to climb out without taking damage. As you approach the last set of yellow tanks, on the left side of the hallway, steer around them. Continue running without jumping, so Lara doesn't bang her head on the doorway at the end of the hall. If you reach the GREEN-TILED CORNER ROOM without taking damage, "Miss Croft" should unlock. (screenshots)
NOTE: You can save again in the GREEN-TILED CORNER ROOM. Just don't overwrite the save from when you first entered this area. Now, if you don't care about getting all pickups, skip the next section and continue to the GLASS-WALLED BAR, below. It is possible to get the pickups after pressing the button behind the bar, but it's easier beforehand.
If you want all pickups, you'll need to backtrack into the danger zone. Turn around and face the corridor you just ran through. If the yellow fuel tanks are still intact, equip the HK in sniper mode and shoot the tanks to create a series of pits in the floor. If you like, you can use Photo Mode to scout the locations of the next two pickups: one large medipack just below the left side of the second gap and another in a crawlspace below the third gap. (screenshots)
To get the first pickup with little or no damage, run forward, veering a little to the left, and jump at the edge of the first opening to land at the bottom of the second, directly on top of the large medipack (18) (236/239). When you have it, climb onto the metal box with the stacked cylinders. Stand close to the wall between this pit and the next to avoid gunfire. Hop back, then quickly take a standing jump up onto the walkway between the pits. Immediately roll and fall off the edge into the next pit. Lara will stumble slightly, but as soon as you regain control, run forward and crouch behind the low step. Lara is safe here. Crawl into the tunnel to get the second large medipack (19) (237/239). (screenshots)
Now for the return trip. Crawl back out, and still crouching behind the low step, angle Lara to the right. Press Look to check that she's facing the box of stacked cylinders. Stand and take a running jump onto the box of cylinders. Move into the corner, under cover. Turn around and position Lara with her back against the wall and the helicopter on her right. Take a running jump without grabbing, and Lara should land at the very edge of the opposite ledge. (You can also grab and pull up, but she'll take more damage.) Immediately take a running jump, angled slightly to the left, to clear the next wide gap. Then take a standing jump over the next gap and run on into the GREEN-TILED CORNER ROOM. Whew! (screenshots)
The helicopter turns the corner and will continue to shoot at Lara when she enters the next room, a GLASS-WALLED BAR. Things are further complicated by the loss of the Look button here. (Yes, it's fun to watch a helicopter destroy a fancy bar, but not after your fifth or sixth death.) Run into the room, cutting to the left. Run behind the bar and immediately duck. Crawl to the far end, where you can stand safely, and press the button. (screenshots)
BUG NOTE: This may be a one-off in the Steam version, but I recommend that you don't save the game behind the bar. I tried several times, and reloading either crashed the game or placed Lara back at the beginning of the level. Saving inside the GREEN-TILED CORNER ROOM seems to be OK.
Cutscene: When you press the button, the helipad door on the other side of the bar starts to open but malfunctions. Zip tells Lara he's found another exit, but the route will be dangerous. (Surprise!)
NOTE: The path for this section (from the bar, past the helicopter, then down to the switch) is indicated by dark blue arrows on the map above. The room where you'll trap the cyborg is marked with a black 'X'.
With the helipad door out of commission, you'll need to go back the way you came. Crawl to the gap in the bar, stand, then run back into the GREEN-TILED CORNER ROOM. If things are going well, you can quick-save, but don't linger. A second cyborg (not counted) is waiting here for Lara. (screenshots)
Now make another run across the pits under heavy fire from both the helicopter and the cyborg, while avoiding the flames left behind when the tanks exploded. You're probably a pro by now, but if necessary, check the linked page with screenshots.
When you pressed the button behind the bar, the lasers in the doorway at the end of the hall reactivated. So run through the open doorway on the right. Sprint up the ramp and down the other side. After that, Lara is safe from the helicopter, though not from the cyborg. (screenshots)
TRAPPING THE SECOND CYBORG: As you cross the pits, the cyborg follows. You can't destroy him with gunfire, so you'll need to trap him. At the bottom of the ramp, you'll pass over a grate with a switch below. Run forward into a small room with a window on the right. Exit on the left (the only way out). Follow the narrow passageway forward then left. The FOUR-WAY INTERSECTION lies just ahead. It's blocked by lasers, so take the first left, down the ramp into the room below the grate. If you've done everything right, you should be able to look up through the grate and see the cyborg entering the room with the window ('X' on the map). Use this first switch to trap him there. (Doing this also re-orients the lasers up at the FOUR-WAY INTERSECTION.) (screenshots)
NOTES: As far as I know, in the remaster, you can safely save the game at any point from here on. This level is notoriously glitchy, though, so I would recommend saving in a new slot just in case. The map shows the path to obtain the last secret (green arrows), destroy the cyborg (orange arrow), and retrieve the KEY BIT he drops (pink arrows).
GAS CHAMBERS: From the room with the first switch, below the grate, head up the ramp and turn left. At the FOUR-WAY INTERSECTION, go through the door on the left with the "Danger" sign. (It's the only other doorway not blocked by lasers.) This passage leads into a room with poison gas jets. Lara will hold her breath as long as she can. (You'll see the blue breath bar, just as you do when swimming.) She'll lose some health just from breathing the gas, but you can crouch and crawl along the floor as needed to replenish Lara's oxygen. (screenshots)
To reach the second switch and the final secret, follow the path marked in green on the map: Go straight through the first poison-gas room and out the other side. (The door opens automatically as you approach.) Run through the second room, which has a low platform but no switch, and out the door on the left. Inside the third room, immediately crouch and look to the right for a crawlspace containing the final golden rose (20) (238/239) (SECRET #3, 36/36). If you found all secrets in the New York levels, you'll unlock the "Codex of VCI" achievement/trophy here. Crawl back out, jump onto the low platform, and pull the second switch to unlock a door elsewhere. (screenshots)
From the second switch to the third switch, follow the path marked in orange in the map: Roll and run straight across the room and through the door where you entered. In the next room, 2 soldiers (11-12) (61-62/62) will try to stop you. These are the final enemies in the game, so feel free to use your remaining ammo taking them out, or just run past them through the door on the right. In the next room, go through the door on the right, which was previously locked. Jump up on the platform and pull the third switch to pump the poison gas from this room into the next, killing the cyborg (not counted). You can watch this happen through the window. When he expires, the "Gassassin" achievement/trophy pops. (screenshots)
SECOND KEY BIT: When the second cyborg is dead, flip the third switch again to pump the poison gas from the other room back into this one and unlock the exit. Now, follow the route marked with pink arrows on the map. That is, roll and run through the door opposite the switch into the next room. Exit through the door on the right, which takes you back to the FOUR-WAY INTERSECTION. Go through the doorway on the right (with the yellow "Caution" sign). Take the next right down the ramp to the first switch, under the grate. Use this switch again to re-open the doors above. (screenshots)
Return up the ramp and turn right, then right again, into the room where the cyborg died. Pick up the KEY BIT (RIGHT) (21) (239/239) he dropped. You should now have two halves. If you obtained all 239 pickups in the game, you'll unlock the "Hoarding Order" achievement/trophy. Well done! (screenshots)
BACK TO THE LOBBY: At this point, lasers block the door between this room and the FOUR-WAY INTERSECTION. So exit through the hallway that passes over the grate above the first switch. (Follow the path marked in yellow on the map.) Run up the ramp and down the other side. Then quickly run to the right to avoid the helicopter. (screenshots)
BUG NOTE: If there are lasers blocking the doorway between the helicopter area and the crawlspace (screenshot) then you've inadvertently triggered a bug, most likely by exploring the GAS CHAMBERS before trapping the second cyborg. If there is a work-around, I'm not aware of it. I'd recommend reloading an earlier save (i.e., just after defeating the first cyborg or earlier) and replaying this section. You can download a Steam save here. The RED ALERT! collection includes a save at secret #3. Be sure to follow the linked instructions carefully so you don't lose your progress in the other remastered games.
Turn right before the crawlspace and you're back at the FOUR-WAY INTERSECTION. Go into the passageway on the left (the one with no sign and no lasers). Just before the low ledge, turn around and jump straight up to grab the ladder. (Or, climb onto the ledge, turn around, and jump forward to grab the ladder.) The trapdoor above should now be open. Climb to the top of the ladder and dismount on the left. (screenshots)
BUG NOTE: Again, I was unable to quick-save here and reload without crashing the game. So I'd recommend not doing that.
Voiceover: When Lara drops down from the duct into the lobby, Zip congratulates her on a job well done and advises her to get out.
Combine the two KEY BITS to make the HELIPAD KEY and use it to open the exit. Go up the ramp to end the level and the game. The achievement/trophy "To Absent Friends," for finishing the VCI levels, unlocks automatically. (screenshots)
Final Cinematics: Lara makes a daring escape. Back at Croft Manor, her friends toast her memory. And, in Egypt, Von Croy's workers discover Lara's backpack amid the rubble.
†UPDATE HISTORY: Updates made prior to the Tomb Raider IV-V-VI Remastered release, including credit for tips sent in by other players, are tracked in the archived classic guide.
12/21/25 - Remastered guide first posted.
*NOTES ON PICKUPS, SECRETS, AND KILLS: There are 239 pickups and approximately 62 kills in the entire game. The total number of pickups includes 36 golden rose secrets. All pickups are required for the "Hoarding Order" achievement/trophy. Finding all secrets unlocks an achievement/trophy at the end of each level set (Rome, Russia, etc.) As in the previous VCI HQ levels, the armored soldiers and enemies killed in stealth are not counted as "official" kills. See the footnote following the STREETS OF ROME walkthrough for details on how these statistics are tracked in-game and in this walkthrough.
**VON CROY JUNIOR AND SENIOR: The other man in the cutscene with Werner von Croy is not identified in the game, but based on information gleaned from an archived Capcom Japan website, the Tomb Raider Fandom Wiki identifies him as Werner's father. The way the man speaks to Werner, calling him "foolish boy," seems to support this.
NOTE ON LEVEL MAPS: Special thanks to VGCartography for the excellent level maps, which are used here with permission. Visit VGCartography on DeviantArt and follow on Twitter/X and YouTube for more fantastic game maps.
‡NOTE ON VIDEO GUIDES: Eldin's videos don't always follow the same strategies I use in my walkthroughs, but if you prefer that format, I think you'll find them very helpful.
DARK MODE: I plan to add optional dark mode for these pages, but my current priority is updating the walkthroughs. Meanwhile, may I suggest a reputable dark mode browser extension, such as Dark Reader? (Download only from trusted sites, like darkreader.org or your browser's official add-on/extension site.)
WAS THIS WALKTHROUGH HELPFUL? If not, I apologize and invite you to contact me with any questions. If you need help right away, I recommend the r/TombRaider subreddit. If this guide was useful, please consider supporting my work financially or in other ways. For details, visit tombraiders.net/stella/support.html. As always, I welcome your corrections/suggestions. Thank you!
Copyright © 2000- - Stellalune (). Feel free to copy or print this walkthrough for personal use. By all means, share it with friends, but please include this credit line so people can send me their feedback. No part of this walkthrough may be reproduced on another site without permission. Follow this link for details about this site's advertising and privacy policy.