Stella's Tomb Raider Mobile/Cell Phone Game Walkthrough - Quest for Cinnabar
 Level 11: The Summer Hall (MP4234)
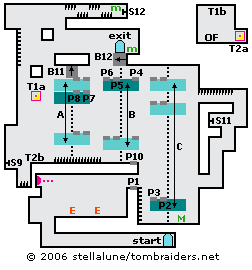
Run along the hall to the left, climb the ledges and kill the 2 monks in the room above. Wait for the gargoyle above to shoot a fireball and climb over the ledge, triggering a pressure pad (P1), and down the ladder on the other side. Get the medikit off to the right.
There are 3 moving platforms (labeled A, B and C on the map, from right to left, in the order Lara reaches them). The pressure pad (P1) Lara just triggered causes the rightmost platform (A) to move up and down as long as Lara is standing on the pad. Stand on the pad to move the platform up then all the way back down into its lowest position. Be sure to drop down onto the ladder whenever a fireball passes overhead. After lowering the platform, climb onto it.
There are 2 pressure pads on the platform itself. The right pad (P2) moves this platform (A). The left pad (P3) moves the platform on the left (B). Stand on the right pad and ride the platform upward until it is about halfway up the room.
Step off the right pad and onto the left pad (P3) and watch the platform to the left move up and down. When it moves level with the platform Lara is standing on, jump over to it.
This platform (B) has 3 pressure pads. The right pad (P4) moves the platform on the right (A). The middle pad (P5) moves this platform (B), and the left pad (P6) moves a third platform (C), located just to the left. Walk across the middle pad (it doesn't matter if the platform Lara is on moves a bit) and step on the left pad (P6). Watch the platform to the left, and when it moves level with the one Lara is standing on, jump over to it.
This platform (C) has 2 pressure pads. The right pad (P7) moves the middle platform (i.e., B, the one to your immediate right). The left pad (P8) moves the pad it's on (C). Stand on the left pad. When the platform reaches its highest point, step to the left so it stops moving.
Walk to the left edge and jump into the mid-air teleporter (T1a) to emerge in the room at the top right corner of the map (T1b). Pick up the Ornamental Firestone (QC2063). Step into the teleporter (T2a) to emerge at the bottom left of the big room below (T2b).
Jump over the spike pit to the left and use the switch (S9) to retract the spikes off to the right and in the hallway at the upper right corner of this room.
Jump back over the spike pit, cross the floor that had been blocked by spikes, and continue to the right to another pressure pad (P10). Stand on this pad to move the platform (C) on the right. When it moves level with Lara, jump onto it.
Stand on the pad (P2) near the middle of the platform to move it up and down. When it moves level with the opening high on the right wall, step off the pad and jump into the opening. (NOTE: This jump is a little tricky. Try to make sure the platform is level with the opening so Lara won't miss and fall.)
Go to the right and drop down only twice. Then climb up on the left and use the switch (S11) to move the block (B11) above the leftmost moving platform (C). Climb back to the hallway above the switch. Walk to the edge and jump over to the platform (A). Stand on the left pressure pad (P3) until the middle platform (B) moves level with the one Lara is standing on. Then jump over to it.
Stand on the left pad (P6) to move the platform on the left (C) level with this one (B). Jump over to it.
Stand on the left pad (P8) to move the platform on which Lara is standing. Now that the block above (B11) has been moved, the platform will go higher. When it reaches its highest point, step to the left to stop it from moving.
Walk to the left edge and jump to grab the block above. Pull up and jump to the ladder on the left wall. Climb to the top, turn right and jump to grab the next block, pull up, step to the right and then jump to grab the ledge with the spikes.
Wait for the spikes on the ceiling to retract then pull up and immediately duck. Watch the timing of the spikes. When the floor and ceiling spikes retract, stand up and move to the right so Lara is standing under the second set of ceiling spikes. Immediately duck. Wait for the spikes to retract again and continue to the switch and medipack. Use the switch (S12) to extend a block (B12) below near the exit.
Carefully retrace your steps past the spikes, pausing and ducking under each set of ceiling spikes. The low ceiling prevents Lara from jumping, so hang from the edge and drop onto the ledge below. Walk to the right edge and jump to grab to the ledge you just extended. Pull up, use another medipack and exit the level.
 |
|
NOTE ON ITEM & MAP CODES: Each level and item has a code, which can be found on the map screen or item info screen. Once you have a code, you can enter it on a page at the Tomb Raider Mobile or Eidos Mobile UK web site to access a level map or detailed item information. My walkthroughs include all of the item info, as well as my own maps, which are a bit more detailed than the unlockable ones.
Copyright © 2006- Stellalune (). In-game item descriptions copyright © Eidos, Ltd. Feel free to copy or print this walkthrough for personal use. By all means, share it with friends, but please include this credit line so people can send me their feedback. No part of this walkthrough may be reproduced on another site without permission. Follow this link for details about this site's advertising and privacy policy.
WAS THIS WALKTHROUGH HELPFUL? If not, I apologize and invite you to contact me with any questions. If you need help right away, I recommend the r/TombRaider subreddit. Other fan-run forums are listed at tombraiders.net/stella/community.html. If this site was useful, please consider supporting it financially or in other ways. For details, visit tombraiders.net/stella/support.html. I also welcome any and all suggestions to improve things. Thank you!
Stella's Tomb Raider Site: tombraiders.net.