Stella's Tomb Raider Anniversary Mobile/Cell Phone Game Walkthrough
 LEVEL 3: QUALOPEC'S TOMB
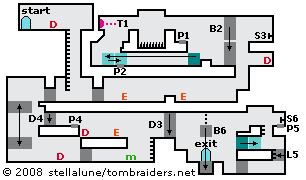
Get the dynamite and climb down the ladder. Set the dynamite near the crumbling wall to the right and jump out of the way before it explodes.
Shoot to the right several times to kill the 2 tribesmen in the next room. Go to the right, climb up and get more dynamite. Jump the gap to the left and climb over the movable block onto a ledge with a pressure pad (P1).
The pad triggers a dart trap (T1) off to the left. Wait for 2 darts to pass then pull up, step to the left edge and jump over the spike pit to grab the opposite ledge. Wait for 2 more darts to pass, then pull up and drop down on the other side.
Lara lands on another pressure pad (P2), which lowers a block on a chain (B2) off to the right but only as long as there is weight on the pad. Go to the right past the pressure pad. Grab the movable block and pull it as far as possible to the left. Climb over it, so Lara is on the right side of the block, and pull it once onto the pad.
Go to the right and climb onto the block (B2) you just lowered. Jump across the gap to the right. Use the switch (S3) to open a door (D3) in a room below. Dropping from this ledge will hurt Lara a bit, so if her health is low, you may want to jump back to the dangling block, climb down, push the movable block off the pressure pad and then climb down the ledges the way you came.
Return to the left through the room where you shot the tribesmen. Use dynamite to blow up the crumbling wall below the ladder. Walk to the left edge. Jump onto the moving platform. Hang from the right edge as it descends, then drop to the floor.
Get the dynamite and use it to destroy the crumbling wall. Go to the right. If Lara's health is in good shape, leave the medipack for now. Climb the ladder and shoot the enemy before he can blast Lara. Jump across to where he was and grab more dynamite. The pressure pad (P4) here opens the door (D4) just to the left so you can return to the upper rooms, but you shouldn't need to do so.
Climb down and use the medipack if you didn't get it before. Then continue to the right past the exit, which you can't reach yet. Use dynamite to destroy the crumbling wall and quickly climb out of the way before it explodes. Go through to the right.
Climb the two short ladders. Lara can't help but step on the pressure pad (P5) as you use the switch (S6). The pad extends a small ledge (L5) below. The switch lowers a block (B6) into the pit near the exit. Drop down and pull the movable block once to the right. Climb back onto the ledge above it, drop and hang from the left edge, drop again to grab the ledge below, and then drop to the floor. Climb up to the exit and continue to the next level.
 LEVEL 4: DELVING DEEPER
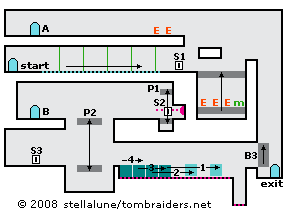
Step onto the moving floor and draw guns. When Lara moves past the vertical beams of light, a platform moves up from a lower room just ahead. Two dogs and a warrior ride up on the platform. Lara can't shoot the dogs while standing, so duck and keep firing to the right and you should be able to kill all three before Lara reaches the end of the conveyor. Use the medipack if you need it.
(NOTE: Alternatively, as you ride the conveyor belt to the right, walk to the left to keep Lara from running into each of the light beams. When each beam cycles off, stop walking and ride past it. If you manage to repeat this for all five beams, the platform will never rise up. You won't have to fight the three enemies, but neither will you be able to get the health pack.)
Use the switch (S1) to lower a small platform (P1) in the room below. Then climb up onto the ledge on the right. Turn around and jump to grab the edge of the ledge to the left. Pull up and shoot the dog and robot. Climb back down and use the medipack if you didn't before.)
Follow the upper hallway to the left end. Go through the door (A) and descend two floors to emerge from another door (B). Immediately duck to avoid flying darts from the right. Work your way to the right, ducking each time a dart sails overhead.
Use the switch (S2) to start the platform to the left moving up and down. Work your way back over to it, jump onto it, ride down and jump off on the right.
Move to the right side of the row of movable blocks (1-4). Pull the rightmost block four times. Pull the next block three times. Pull the next block twice and the leftmost block once. Now the blocks should be arranged with a block-wide gap between each one.
A stone block (B3) prevents you from reaching the exit to the right. So go to the left, past the pit below the moving platform, to find another switch (S3). Use it to raise that block. Doing this also raises a field of spikes beneath the movable blocks and in the small pit beyond.
Return there now. To reach the exit without getting speared, jump across the boxes you rearranged earlier and grab the ledge beyond. Pull up and go through the door to finish the level.
Walkthrough text and diagrams copyright © 2008- Stellalune (). Feel free to copy or print this walkthrough for personal use. By all means, share it with friends, but please include this credit line so people can send me their feedback. No part of this walkthrough may be reproduced on another site without permission. Follow this link for details about this site's advertising and privacy policy.
WAS THIS WALKTHROUGH HELPFUL? If not, I apologize and invite you to contact me with any questions. If you need help right away, I recommend the r/TombRaider subreddit. Other fan-run forums are listed at tombraiders.net/stella/community.html. If this site was useful, please consider supporting it financially or in other ways. For details, visit tombraiders.net/stella/support.html. I also welcome any and all suggestions to improve things. Thank you!
Stella's Tomb Raider Site: tombraiders.net.