STELLA'S TOMB RAIDER 2 REMASTERED WALKTHROUGH
The TR2 Remastered guide is now complete. For levels that have not yet been updated, I will continue to link to the ORIGINAL WALKTHROUGHS, which cover all the basics. Follow this link for the archived classic guide.
I use classic tank controls, and mostly reference them here. If you're using modern controls, these guides should still be helpful for navigating the levels, but you'll probably want to check out some of these YouTube videos for modern control tips and tutorials.
TRAINING LEVEL: LARA'S HOME (Remaster)
Updated: 8/1/26(†)
LEVEL MAP by VGCartography (used with permission)
Croft Manor Video Walkthrough by Eldincy‡
To access the training level, choose the Polaroid snapshot labeled "Lara's Home" in the first menu ring.
Taking a run through the Assault Course is a good way to learn all the moves in a safe setting. If you've never played Tomb Raider before, you may want to start with the TR1 training level, which does a better job of explaining each move. Or review the Classic Controls Page.
Then try to unlock the "Ready to Raid!" achievement/trophy by completing the assault course in 1:20 or less. If you're struggling, there are many tutorials with useful shortcuts on YouTube. Or, you might just need to play through the main game until you're feeling more proficient with the controls. Then return and tackle this challenge.
Enter the mansion through the main entrance (on the far side of the house from the assault course). The door opens when you press the button just to the left of it. (screenshot) From the main hall, you can explore several side areas. (screenshot)
In the bedroom, upstairs on the left, you may notice a locked door with no key. (screenshot) You'll return here in the final level of the game, Home Sweet Home, with the key. For now, you might want to familiarize yourself with the layout of the house and grounds so you'll have an easier time later on. Also take note of the button on the wall in the Ballroom. (screenshot) It turns on the "Venice Violins" soundtrack. This can be done just for fun, but it will help you unlock an achievement/trophy in the final level. There are also a few secrets to be found even at this early stage.
Note that you can't save the game in the training level.
(Click thumbnails for larger images.)
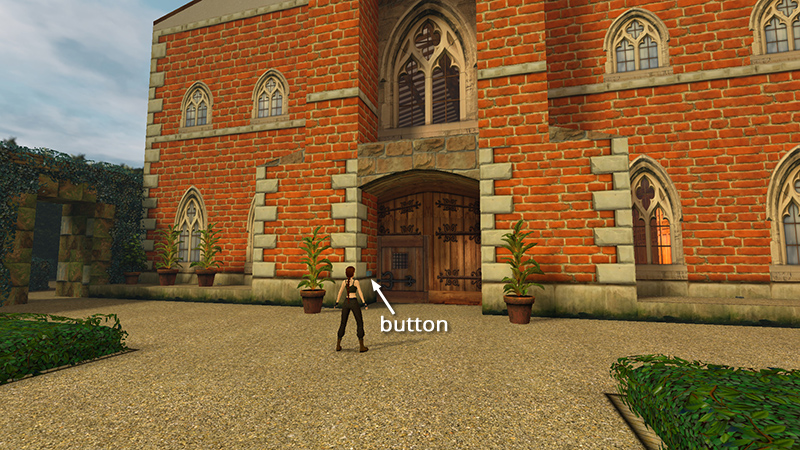
Use the button to open the front door.
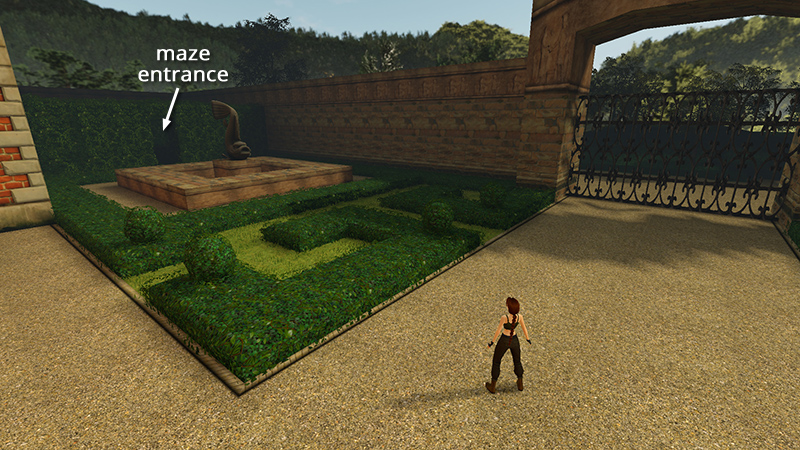
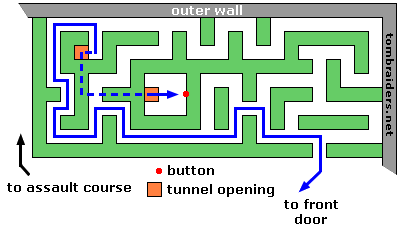
Go into the hedge maze and locate the tunnel opening. (See diagram.)
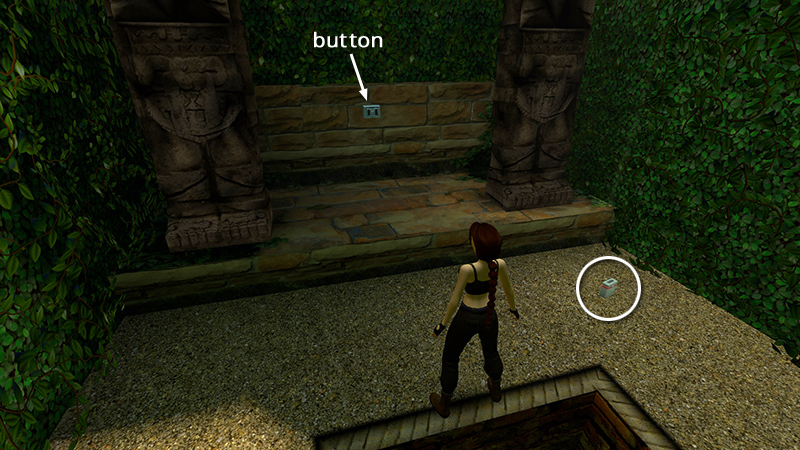
Follow the tunnel to a hidden area with a button and flares.
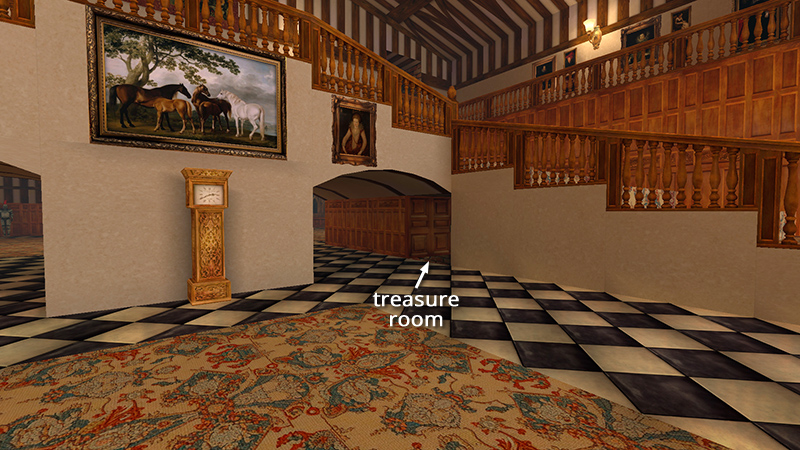
Light a flare, press the button, and run back to the secret door before it closes.
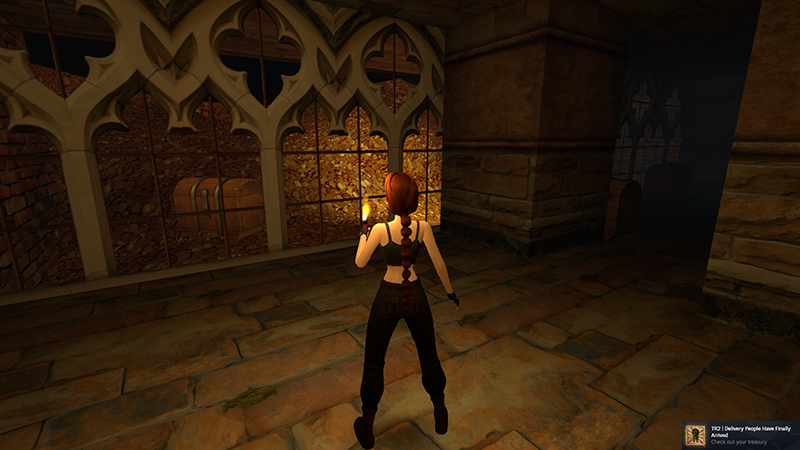
Inside are treasures galore!
Lara's Treasure Room
Lara stores the loot she's collected during her many adventures in the basement of her mansion. Here's what you need to do to check it out and unlock the "Delivery People Have Finally Arrived" achievement/trophy.
- You start the training level near the assault course. Go around to the opposite side of the mansion and press the button beside the front door to open it.
- Locate the concealed door on the right side of the main hall, just beyond the staircase. (It's shown in the second to last screenshot.) That's where you're ultimately headed.
- Now return outdoors and go into the hedge maze, on the left, beyond the fountain, when facing the gate and driveway.
- Go into the maze and make your way to the tunnel opening. (The blue line on the map below shows the quickest route from the maze entrance to the tunnel.)
- Drop into the tunnel and follow it to the secret enclosure in the middle of the maze. (The broken blue line indicates the underground part of the route.) Pick up the flares, since you'll be needing them soon.
- The button here opens a door inside the mansion. A brief cutscene shows its location. You have about 70 seconds to through that door before it closes. So immediately after pressing the button, tap Look (to bypass the cutscene of the door), then Roll. Run forward and fall into the tunnel. Keep running forward then right and climb out at the other end. Now run back through the maze as quickly as you can. Take running jumps on the long straightaways to go a little faster. (Again, the blue line on the map shows the quickest route.)
- Continue across the courtyard and in through the front door. Use running jumps here to cover ground more quickly. Take running jumps across the main hall to the door and run through before it closes.
- Once you make it inside, light a flare, go down the stairs, and explore. The achievement/trophy will pop as you admire your hoard.
- The button on the wall at the top of the stairs opens the door again when you want to leave.
NOTE: If you're struggling with the timed run but are proficient with the corner bug (below), you can bug up to the top of the hedge maze (screenshots), jump across the tops of the hedges, hop down near the fountain, and then run the rest of the way to the secret door.
If Winston, the butler, keeps tripping you up, you can get him out of the way for a while by trapping him in the freezer—and unlock the "Crime and Punishment" achievement/trophy in the process. Enter the mansion through the front door. Go into the kitchen (on the left, past the stairs) and approach the back door to open it. Wait for Winston to appear. Press the button opposite the massive kitchen sink to open the freezer. Go inside, all the way to the back, and wait for him to follow. Then run up against him, and he'll start making noises: grunting, rattling his tea tray, etc. It may take a little while, but eventually he'll make a fart sound. When that happens, run/jump past him, exit the freezer, and quickly press the button to shut the door, trapping him inside. The achievement/trophy should unlock as the door closes. Now you can either let him out—he'll thaw after a few seconds—or leave him on ice so you can explore in peace. (screenshots)
NOTE: If you're deaf or hard of hearing and can't tell when Winston passes gas, unfortunately there doesn't seem to be a visual cue. I'd suggest standing close to him to trap him against the wall or the counter, then wait a bit. It may take a minute or two before he does it. Run out, shut the door on him, and hope the achievement/trophy pops. If it doesn't, try again.
Corner & Window Bugs
You can also use the corner bug to get to some hard-to-reach places in the training level, including the roof and outside the main gate. For detailed instructions on this and other helpful glitches, visit my Useful Bugs page. Here's one possible route:
Use the corner bug twice on the right side of the front door to get onto the roof. Cross over to the back right corner and move into the V-shaped gap above the glass-roofed swimming pool. Step back off the edge where it's lowest and press Action to grab, as though you were going to do a safety drop. Lara won't actually grab the edge, but dropping this way will enable her to survive the fall. Jump from the swimming pool roof onto the hedge maze. Run along the top of the hedge toward the front of the mansion. Climb onto the exterior wall and head to the right, toward the front gate, where you can then drop down outside. To get back in, use the corner bug on the left side of the gate. (Screenshots are on a separate page, or check out this video walkthrough. It was made in the classic game, but still applies to the remaster.)
Alternatively, if you don't want to go on the roof, you can get outside the gate more quickly by using the corner bug on one of the structures near the end of the assault course then following the wall around to the front of the manor. (screenshots)
Another fun glitch is a window bug, which enables you to get inside the manor quickly, leaving the butler outside so he doesn't bother you as you explore. Start by using the corner bug to get on top of the assault course pillar nearest the bathroom window on the upper floor. Take a running jump to grab the windowsill and pull up through the window into the bathroom. If you haven't mastered the corner bug yet, you can still use this glitch by following the assault course in the usual way and then jumping to grab the windowsill. (screenshots or video)
When you're ready to move on to the main game, open the menu ring, navigate down to the lower ring, select the Passport, and choose "Load Game," "New Game," or "Golden Mask" (for the expansion levels).
TR2 Main | TR2 First Level | Golden Mask First Level
†UPDATE HISTORY: 2/5/24 - Added VGCartography's level maps, with permission. Visit VGCartography on DeviantArt for high-res versions, and follow on Twitter/X and YouTube for more fantastic game maps.
8/1/26 - Guide updated for the remaster. Better late than never. :D
ACKNOWLEDGEMENTS: Special thanks to Jason McAllister, who originally discovered the corner bug, and to Theresa Jenne, whose site (tombraiders.com) is no more, but who was known as the queen of the Expert Challenge back in the day. Theresa inspired many diligent bug-finders over the years. Thanks also to Jeff Reid, Connell, Ferret, EldinSuper and Megachristopher1 for a few of the tips/refinements used here.
‡NOTE ON VIDEO GUIDES: Eldin's videos don't always follow the same strategies I use in my walkthroughs, but if you prefer that format, I think you'll find them very helpful.
DARK MODE: I plan to add optional dark mode for these pages, but my current priority is updating the walkthroughs. Meanwhile, may I suggest a reputable dark mode browser extension, such as Dark Reader? (Download only from trusted sites, like darkreader.org or your browser's official add-on/extension site.)
WAS THIS WALKTHROUGH HELPFUL? If not, I apologize and invite you to contact me with any questions. If you need help right away, I recommend the r/TombRaider subreddit. If this guide was useful, please consider supporting my work financially or in other ways. For details, visit tombraiders.net/stella/support.html. As always, I welcome your corrections/suggestions. Thank you!
Copyright © 1998- - Stellalune (). Feel free to copy or print this walkthrough for personal use. By all means, share it with friends, but please include this credit line so people can send me their feedback. No part of this walkthrough may be reproduced on another site without permission. Follow this link for details about this site's advertising and privacy policy.